|
Applies to Models 2&5 Single, and 6,8,10,23 Triplex INTRODUCTION
More than merely devices created for mowing grass, the Excellence of design,
construction and operation of Locke power mowers are unparalleled. Developed
over a half a century ago, Tested and proved, Locke power mowers may be
considered, in terms of today's technology, the ultimate response to the need
for the highest degree of quality lawn care. These magnificent green machines
with their distinctive gold coachwork striping are legendary and known
throughout the world for generation-spanning durability and unequalled
performance in the precision cutting of grass. Locke
power mowers are heavy-duty, precision instruments. No capricious model year or cosmetic style changes are
instituted, although improvements are continually incorporated into all models.
The most recent evidence of this is the introduction of the new
""Contractor"" Series.
Whatever model of Locke power mower you have purchased you have our
assurance that, with proper care, you are the owner of a machine which will
provide many years of dependable service. To
extract the fullest possible value from the performance of your Locke power
mower we urge you to read this manual very carefully. Should you find any of the
instructions unclear, please contact your Locke dealer or call the Locke Factory
Service Department at Williams Industries, Inc. Phone:
(770) 995-1135
Fax:
(770) 995-1962
LOCKE
MOWER FEATURES: MOST
PERFECT CUT EASE OF HANDLING COUNTERBALANCED CUTTING UNITS UNCOMPARABLE
Maneuverability FINGER TIP Controls RIDING
SULKY (OPTIONAL)
25"and
30" Plain or Reverse Mowers The
Locke ""single"" units are the most practical mowers for
small areas, cut-up lawns, flower gardens, cemeteries, schools, etc.
They do a complete job in one operation: overhang raised borders 1/3 of
their width . . . make a clean cut close
to obstructions (with 2"")... leave no uncut rolled down grass; thus
eliminating hand trimming operations.
The
Locke Triplex is the most economical mower available for use on large cut up
lawns with overhanging shrubbery, walks,
and raised borders. On many such lawns they eliminate all hand trimming. Maximum
cutting efficiency and savings in time and energy are assured with precision
built, motor driven and counterbalanced cutting units. Riding sulkies and
reverse gear mechanism are optional features of the Locke mowers.
HOW
TO MOW YOUR LAWN We
recommend that the direction of mowing a lawn be changed from time to time so
that the same pattern of the tractor rolls will not always be over the same
grass. The first mowing should be made in one direction; the next mowing should
be done with the direction at right angles to the first Occasionally it is well
to run the machine in a diagonal pattern which will have a tendency to even out
the rolling effect on When
moving along the edge of a border with a triplex mower, it is advisable on the
first pass to elevate the outside cutting unit, and to lower the unit on the
next pass; this will change the pattern of mowing and minimize the rolling
ridges into the lawn. OPERATION
Starting
the Motor Make
sure that the tractor clutch lever, on the right handle, and the cutter clutch
lever, on the left handle, are released before cranking the motor. NOTE:
In this booklet all right or left designations are given from the
operator's position. A small lever on the left handle controls the action of the
governor and, in turn, the speed of the motor. Move this lever down slightly to
open the throttle. Check to see that the oil in the crankcase is at the proper level.
Close
the carburetor choke valve (refer to motor manufacturer's instructions).
Raising
Cutter Units To
elevate the front unit for transportation or storage, pull the hand lever,
located next to the tool box, over center toward the operator. When transporting
the Triplex mowers, the side units should be raised to the vertical positions.
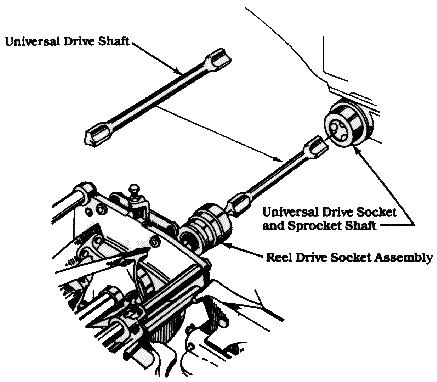
To raise the side units, release the inside collar and draw the units out
laterally to release the short shafts which connect the universal joints (figure
2.00 Place these shafts in the tool box. Then raise the side units to the
vertical position and hook them onto the handlebars. The side units are also
provided with carrying hooks or chains by which they can be carried at an angle,
from the handlebar, without disconnecting the drive shafts, to allow the mower
to cross driveways, etc. TRANSPORTING
With the motor running, the cutter clutch disengaged, and the brake released on the reverse mowers, a slight movement of the tractor clutch lever will start the machine forward. As soon as the machine is underway, the clutch lever can be fully engaged to snap the clutch in the locked position. On plain mowers, the downward pressure disengages the clutch and continued pressure applies the brake to stop the mower. On reverse mowers, a pull on the tractor clutch lever will disengage the clutch. Raising the lever over the stop and continuing the pull on the lever will put the mower in reverse.
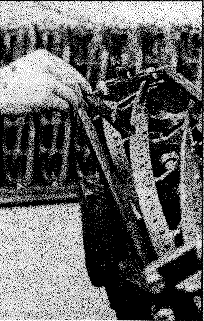
Figure 2 Side Cutter Universal Joint Drive Connections
Lowering
Cutting Units when ready for cutting, the
front unit elevating hand lever should be pushed forward over center to lower
the cutting unit to the ground. On the triplex machine, the side units must be
unhooked from the handlebars to be lowered to the ground. After lowering them to
the ground, it is necessary to pull them outward so that the universal shafts,
connecting the universal socket, can be inserted (figure 2). One end of the
universal shaft is inserted into the universal socket on the inner end of the
reel shaft. Then the cutter unit is slid toward the center until the other end
of the shaft enters the universal socket on the drive unit located under the
motor. When the shaft is in place, the fixed locating collar on the front tie
rod should hit the carrying bracket. Slip the loose collar on the front tie rod
into contact with the carrying bracket and tighten the thumb screw in the collar
to prevent the unit from sliding away from the universal housing. The other side
unit is connected in the same manner.
Cutting
On
reverse mowers, release the parking brake; then engage the cutter clutch lever
on the left handle gradually, finally letting it move into its extreme position
where the clutch is locked in engagement. The cutter units are now operating and
it is only necessary to operate the tractor clutch to start cutting. A considerable variation of speed of travel can be obtained by
manipulating the small motor speed control lever on the left handle. There is no
need to leave raised borders for hand trimming. Instead, drive the machine so
that the cutter unit will overhang the border to cut all the grass. Any turn, no
matter how sharp, may be made without injury to any lawn. Wide swings or
manipulations of cutter lifting levers are unnecessary. The Triplex machine can
be operated with one or both side units raised. This feature allows three
different widths of cut. The side units flex 15 degrees up or down from the
tractor unit. All cutting units are power driven with a positive chain drive. The flexibility of the Locke
mower and its ability to do the trimming, will save approximately 50% of the
time required to cut most lawns. Lubricate chains after each mowing or cleaning with a thin lubricating oil. Figure
3
MAINTENANCE
LUBRICATION
All
lubricating points are marked with a dash of red paint. Hydraulic type fittings
are used at all points where a light grease makes a suitable lubricant. At other
points marked with red paint, use a little oil to prevent rust and excessive
wear. General lubrication points are shown in figure 3. The reel bearings on the
cutting units and the tractor's roll shaft bearings should be lubricated after
every 10 hours of running; caster roll bearings and bushings after every 20
hours. This frequent lubrication is
advisable as the surplus grease will expel any trash or grit which might
otherwise be forced past the seals into the bearings. On
reverse mowers the transmission oil level should be checked at regular intervals
by removing the oil level pipe plug (fig.5) located at the front side of the
transmission case. The oil should be drained after the first 10 hours of
operation (the drain plug is located at the bottom of the transmission), and
refilled to overflow at the oil level plug with Automatic Transmission Fluid.
Additional changes of oil should be made after each 100 hours of operation. The
transmission requires only 12 ounces of fluid. Keep
all chains well lubricated with a thin lubrication oil. It is best to lubricate
them well after each mowing or every four hours of mowing. This prevents rusting
while standing idle and allows the oil to penetrate to the pin and bearings by
capillary action. When a chain is operated without lubricant, the chain will
wear and the elongated chain will in turn wear the sprockets to conform to the
pitch of the chain. Worn chains make expensive repairs because the sprockets as
well as the chains must be replaced.
CLEANING
AND LUBRICATING AFTER USE
When
cutting is finished, clean the machine. It is much easier to clean it now than
later. At the same time, oil the chains to prevent rust and to allow the oil to
soak into the bearings. If a high-pressure water hose is used for
cleaning, keep the machine running and lubricate the machine thoroughly
following cleaning. In case of any trouble, don't ""tinker""
with the machine unless you thoroughly understand it; call the service man. ENGINE
The
operating and maintenance instructions for the Briggs and Stratton or Honda
engine are explained in a booklet furnished by the manufacturer. BEARINGS
All
parts which are constantly rotated are carried on annular ball bearings. Bronze
or sintered metal or nylon bushings are used where motion is intermittent. All
rotating bearings are protected by oil treatment felt seals or synthetic oil
seals to retain lubricant and exclude water and grit. The bearings should
receive periodic lubrication as explained in Lubrication. Tractor
Rolls The
tractor rolls are in reality wide-tired wheels. They are mounted on a single
axle which drives them through differential gears. The differential is
composed of two steel bevel gears and two steel pinions with generated
hardened teeth, fully enclosed and packed in grease. Tractor
Tires
The
""Contractor"" Series features four pneumatic tires in place
of the rollers. Tire pressure should be set at 18 psi (cold) for the triplex
mower and 10 psi for the single mower.
Brake
On
the plain mowers, the fork lever, which controls the tractor clutch, also
actuates a brake on the clutch housing. The brake lever is adjustable to suit
conditions. It should be set to apply the brake after the clutch is released and
to engage the clutch after the brake is released with a neutral point
between. On reverse mowers, the brake lever actuates the brake on the tractor
rolls or the extension rolls (75,' models). lull at the center section of the
brake lever handle to apply the brake. To release, pull on the top portion of
the handle."
Clutches
The
clutches, with the exception of the tractor clutch on mowers equipped with reverse gear, are a dry disc type,
limited load, enclosed and not adjustable, using molded friction discs, hardened
dogs and cones and bronze shifting collar. The tractor clutch on mowers equipped
with a reverse gear is a multiple disc type with planetary reverse gear
completely enclosed and running in an oil bath. Reverse
Gear Transmission Forward
Clutch Adjustment: If the machine shows evidence of slippage as the clutch discs
wear, it will be necessary to take up on the adjustment as follows: Reverse
Brake band Adjustment:
The
tractor clutch lever should be in a neutral position 1/8"" before
hitting the stop on the bracket on handlebar. This adjustment can be made with
the rod end. It is necessary to lift this lever over the stop to go into
reverse. This pause eliminates the shock on the tractor chain, ball bearings,
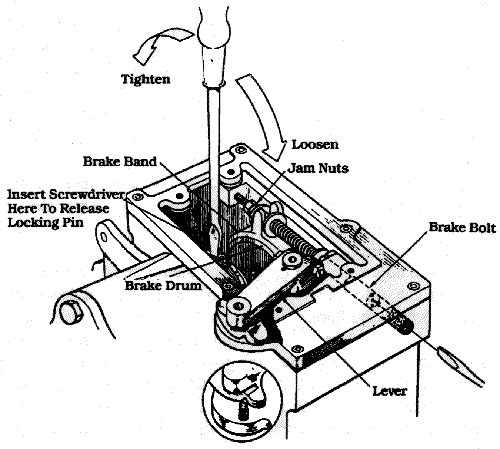
etc. To adjust the wear of the reverse brake band, loosen the jam nuts on the
brake bolt (fig.5) and take up about one full turn on the brake bolt until the
brake drum still turns freely when the clutch lever is in the neutral position
and the clutch shifting fork has moved the flange of the clutch cone just up the
hub of the brake drum. Then the brake band should start to grip the drum when
the clutch lever is pulled back for the reverse to operate. All
adjustments on the machine should be made when the
Figure
5 Reverse
Gear Transmission Adjustment
Adjustments
For Height of Cut
Standard
mowers are set at the factory to cut 1 3/4"". To vary the height of
cut it is necessary to change only the end gauge shoes. This can be done without
disturbing the stationery blade. These
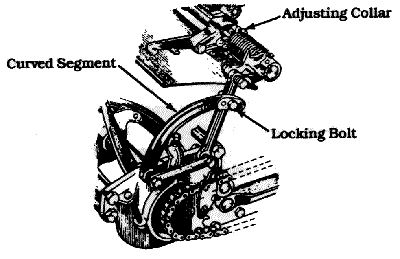
adjustments are in 1/4"" steps by the use of different end shoes. On
the front cutting unit, the curved segment adjustments" affect
the rearward location of the cutting edge of the stationary blade in relation to
the vertical center of the cutting reel. This adjustment is made by changing the
location of the locking bit. For high-cut (2"") shoes, this bolt
should be moved to the rear hole. Use the center hold for standard-cut
(1"" to 1 3/4""). For close cut (1/2"" to
3/4"") use the forward hole in this segment, or replace the segment
with a micrometer adjusting assembly (optional equipment). On the side units of
the Triplex machines, adjusting screws with locking nuts are provided in place
of the segment.
The
side units require very accurate adjustment as they must match the height of cut
of the front unit precisely. The side units must also be equipped with the same
height of gauge shoes as the front unit.
To
adjust the side units, place the mower on a level floor and set the side units
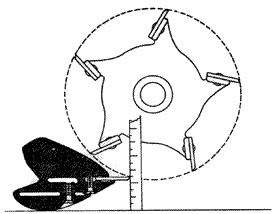
to match the height of the front unit. Measure from the floor to the cutting
edge of the stationary blade with a cutting height gauge or scale as shown in
figure 6. The adjustment is made by turning the nuts (C) on the adjusting
brackets shown in figure 8. The least variation in height cut is very apparent
in the cut grass. The adjusting screw and lock nuts
permit precise adjustment for this purpose. Finally, adjust the universal drive
assembly located under the motor base to insure alignment with the side cutting
units. For close-cut units equipped with lipped bed knives, use the micrometer
adjustment assembly on the front unit in place of the curve segment.
The
cutting units ride on shoes which travel on the cut grass in very close
proximity to the cutting edges of the stationary blades. These shoes carry a
portion of the weight of the cutting units and al59 gauge the height to which
the grass is cut. The remaining weight of the cutting units is carried by the
tractor rolls and is transferred to the rolls by suitable connections including
counterbalancing springs. For the
front cutter unit, springs are provided at each end of the cutter lifting shaft.
These springs are adjustable so that each end of the cutting unit may be set to
give precisely the same pressure for gauging purposes. On Triplex Mowers, the
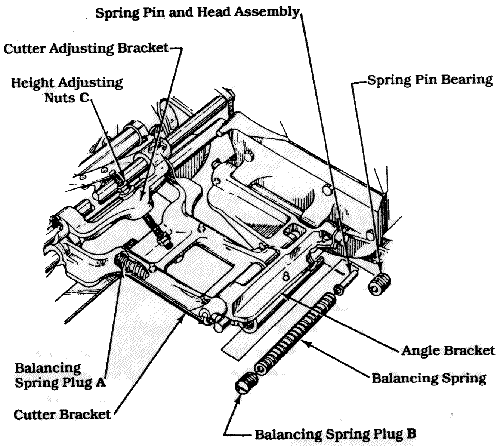
pressure of all the cutting units must be substantially identical. Counterbalancing the 25" and 30" Front Cutting Units: The front unit elevating lever should be pushed forward over center to allow the cutting unit to rest on the ground. On 25" units, wind up the adjusting collar (fig.7) and spring on one side until the extreme end of the cutting unit on that side weighs 10 pounds. Raise scale at left end of cutter unit and read scale just as end of unit leaves the ground. A further raising unwinds the torsion springs and gives a higher reading on the scale. Insert the locking pin in the proper hole in the clutch shaft bracket. Perform the same adjustments on the other end. Check the setting by taking hold at the center of the cutter unit and raising and lowering it several times. Be sure that both ends rise and fall simultaneously On 30" units, follow the same instructions making the weights on each end 12 pounds. Counter
balancing Side Cutting Units: Compression springs are carried in cages on the
under sides of the brackets and cast integral with them, one in the angle
bracket and two in the cutter bracket (fig.8). These springs are adjusted by the
plugs (A) threaded in the spring cages. Adjust the two springs in the cutter
bracket evenly until the cutter unit weighs 20 pounds when lifted by the center
of the rear tie rod. Adjust the plug (B) in the angle bracket until the outer
end of the cutter unit weighs 9 pounds and the inner end weighs 11 pounds. This
is done by screwing in the plug to lighten the unit or back out the plug to make
it heavier. Check
the setting of the side units by taking hold of the center of the cutting unit
and raising and lowering the unit several times. Be sure the outer ends rise a
little earlier and fall later than the inner ends.
Figure 8 Counterbalancing Adjustment for Side Cutting Units
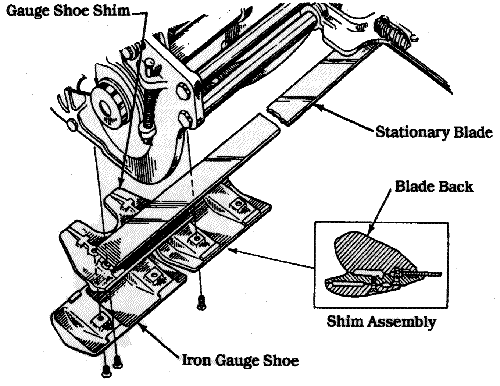
Setting Stationary Blade On the standard mowers, the stationary
blade is a flat strip of hardened steel with ground beveled edges held in place
between the blade back and gauge shoe shims by clamping bolts. This method of
holding permits turning the blade to bring a new edge into use when the
"land" on the blade becomes excessively wide from wear or the edge
gets dull or nicked. Whenever a new edge is brought into use, it is essential
that the reel and stationary blade be lapped or ground to alignment (see
directions for sharpening) On special close-cut mowers, the stationary blade
is a lipped bed knife which is attached to the special blade back with screws.
Whenever the lipped blade is replaced, it is essential that the reel and blade
be ground or lapped to alignment. Setting Cutter Reel Blades The cutting reel is mounted on annular ball
bearings. These bearings are carried in brackets hinged to the cutter side
plates. The hinged brackets have springs which urge the reel blades toward the
stationary blade (fig.9). An adjustable stop screw limits the swing of these
brackets and hence the approach of the reel blades to the stationary blade. The
correct setting is when these blades just touch each other, or are separated not
more than .0025" (the thickness of a hair). If the blades rub together, the wear is excessive
and the power required to drive them increases with the pressure. If the blades
are too far apart, it is impossible to cut grass. The tendency will be to munch the grass and wedge it between
the two cutters.
Figure 9 Adjustment for setting Stationary Blades
Reel Bearings The cutting reel turns on annular-grooved, retainer-type, ball bearings properly located on the shaft by shims of various thickness and locked in place by right- and left-hand threaded nuts, threaded sprockets, or threaded universal joint sockets, according to the application
FEEL
SECURE IN YOUR PURCHASE Through LOCKE'S 60 PLUS YEAR REPUTATION
FOR PRODUCT INTEGRITY AND DEPENDABILITY. IMPORTANT Safe Operation Practices for Walk-Behind Reel Mowers 1. Read the operating and service instruction manual carefully. Be thoroughly familiar with the controls and the proper use of the equipment. 2. Never allow children to operate a power mower. 3. Keep the area of operation clear of all person, particularly small children, and pets. Preparation 1. Thoroughly inspect the area where the equipment is to be used and remove all stones, sticks, wires, hones, and other foreign objects. 2. Do not operate the equipment when barefoot or wearing open sandals. Always wear substantial footwear. 3. Check the fuel before starting the engine. Do not fill the gasoline tank indoors, when the engine is running, or while the engine is still hot. Wipe off any spilled gasoline before starting the engine. 4. Disengage the self-propelled mechanism or drive clutch on units so equipped before starting the engine. 5. Never attempt to make a height adjustment while the engine is running. 6. Mow only in daylight or in good artificial light. 7. Never operate the equipment in wet grass. Always be sure of your footing; keep a firm hold on the handle and walk; never run. Operation 1. Do not change the engine governor settings or over speed the engine. 2. Do not put hands or feet near or under rotating parts. Keep clear of the discharge opening at all times. 3. Stop the blades when crossing gravel drives, walks, or roads. 4. After striking a foreign object, stop the engine, remove the wire from the spark plug, thoroughly inspect the mower for any damage, and repair the damage before restarting and operating the mower. 5. If the equipment should start to vibrate abnormally, stop the engine and check immediately for the cause. vibration is generally a warning of trouble. 6. Stop the engine whenever you leave the equipment, before cleaning the mower, and when making any repairs or inspections. 7. When cleaning, repairing, or inspecting, make certain the blades and all moving parts have stopped. Disconnect the spark plug wire, and keep the wire away from the plug to prevent accidental starting. 8. Do not run the engine indoors. 9. Shut the engine off and wait until the blades come to a complete stop before removing the grass catcher. 10. Mow across the face of slopes; never up and down. Exercise extreme caution when changing direction on slopes. Do not mow excessively steep slopes. 11. Never operate the mower without proper guards, plates, or other safety protective devices in place. Maintenance and storage 1. Check the engine mounting belts at frequent intervals for proper tightness. 2. Keep all nuts, bolts, and screws tight to be sure the equipment is in safe working condition. 3. Never store the equipment with gasoline in the tank inside a building where flames may reach an open flame or spark. Allow the engine to cool before storing in any enclosure. 4. To reduce fire hazard, keep the engine free of grass, leaves, or excessive grease.
|